|
3D-Blox: Technical stuff
|
 |
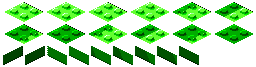
Each level has one (though not necessarily unique) graphics file which specifies
the looks of the background. That input data needs to contain five types of "tiles"
arranged like in the example file below.
 |
- Horizontal ground, illuminated
- Horizontal ground, in shadow
- South west wall, partly illuminated
- South west wall, in shadow
- South east wall, completely in shadow
|
From this 40x59 pixel image, the applet generates 21 building blocks:
These are all it takes to draw the backgrounds. (Well, there are also doors,
keyholes, coins and keys, but those look the same for all levels and are prepared
in advance.)
|
Creating the 3D effect
|
|
This will be old news to Java hackers, but the rest of you may want to keep reading.
A useful property of image objects created internally in a Java applet is that
their looks can be quickly and easily updated as long as their size remains the same.
This is done by altering the contents of the byte or integer array the image was
constructed from, and then calling the Image.flush() method.
It is, however, a computationally intensive process and for a general type of game
it would be much more efficient to simply use a larger set of pre-constructed
images. But for 3D-Blox it would just be too much of an effort to predict
every possible look of an image -- with all combinations of hidden parts. Even if all
the resulting images could somehow fit into the memory of your computer at the same
time, I doubt you would have the patience to download them over the net or wait
for them to be automatically generated by the applet.
Most of the raw object image data 3D-Blox uses is stored as a long array of pixel
values, from which parts are copied and manipulated as the need arises. To draw Pete
with his arms up, the applet transfers the corresponding set of numbers to the 30x30
array of Pete's image object, "flushes" it and then draws the updated image.
So how are the images manipulated to fit in with the background? Glad you asked.
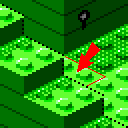
You may have noticed that the playing field can be thought of as consisting of
11x11 squares (OK, so they are rhombs, but only because we get to view
them at such an awkward angle). These are the key to understanding the 3D effect.
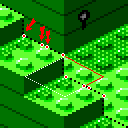
As an example, take the partly hidden square below. Like all other squares in the
playing field it has eight "mask height points" associated with it (marked in the
lower right image). These are used by the applet, internally, to keep track of
what parts of an object will be visible at any given position. The points get
computed while the field is being drawn -- and possibly updated later when a
crystal block appears.
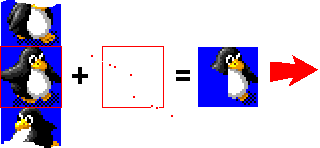
Suppose Pete is to be standing in the middle of that square, facing south east.
Before preparing the object image, the applet interpolates the height mask points with
a curve. When the image data is copied from the main storage to the image array,
every pixel above the curve is duplicated but every pixel below it
gets replaced by a transparent color (symbolized by blue in the following diagram).
My actual algorithms for doing it are rather messy, in order to run fast, so you
will have to settle for this rough description.
The finished image, placed in its proper screen position, will then be "masked" to
fit in with the background as if it were truly 3-dimensional.
|