 |
Rubik Unbound: Technical stuff
|
 |
I've realized it would take far too long to explain every aspect of the
cube, so I'm only describing the user interface here, and it's a very
brief description at that. Check the source code
rubik.java for details.
So... how the heck does the applet determine where on the cube and
what direction any given click-and-drag action corresponds to? Well, the
trick is to know in advance what to look for. That makes things a whole
lot simpler.
Each time the cube gets drawn on the screen -- i.e. we go from a 3D
representation to a 2D projection -- the applet makes notes of where
on the screen each vertex ends up, and computes the screen co-ordinates
of corresponding "twist areas" (which are basically all the legal places
the user could click and drag, that should produce a twist) plus a
direction.
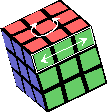
 This picture, for clarity, shows only one twist area (and its corresponding
rotational and drag directions), but each visible side
has four of them, making a total of 12. When the user clicks and drags,
the applet simply has to test for each of the twist areas, "Was the click
point inside it?" and "Is the drag direction close enough to the one
that goes with the area?" Both are very simple algebraic operations.
If one area tests positive, the applet concludes that a twist has begun
and puts the cube into another state.
If not, the dragging is interpreted as a plain rotation and processed
accordingly. Though the cube itself isn't rotated. It's easier to just
move the "camera", or viewpoint, in the opposite direction. The visible
result is the same, at a lower computational cost.
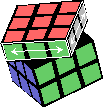
At the beginning of a twist,
the cube gets split up into two portions, each with its own share of the
physical co-ordinates and the colored pieces. Both of them, however stay
in exactly the same physical locations as before, just like during a
rotation. What causes the twisted look is that the applet is now using
two cameras. A secondary camera is rotated around the twist axis
from the primary camera position. Each cube portion is then drawn with
respect to its corresponding camera. (The portion whose square side is
facing away from the camera(s) is drawn first, and then gets overlapped
by the other one in a natural manner.)
 While in the split state, at most two twist areas are active at any given
moment. Clicking inside them and dragging will progress the current
twist clockwise or counter-clockwise. As before, only the angle between
the primary and secondary cameras is changed.
 Any other dragging
moves the primary camera, to give a rotational effect. Since the position of
the secondary camera is specified as merely a rotation around a given axis
from the primary position, that one will tag along as well, completing the
illusion of a rotating cube.
If the camera difference angle is close enough to a multiple of 90 degrees
when the user lets go of the mouse button, the applet rounds off the angle
and twists the colors of the smaller cube portion accordingly. It then
returns the cube to the normal state.
|


